Step 1:
Make sure any important images/illustrations are smart objects. This will allow for easy editing, smart filters and the wonderful thing is that everything is on and off. If someone in the future wants the original image, all the have to do is switch one of those edits you made off. Magic!Step 2:
Lets make that initial asset you are working with a smart object. Right click on the layer you want and select Create Smart Object. You should see a window like that pop out, select and now your image is a Smart Object! Step 3:
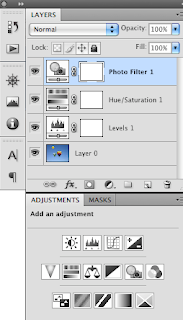
Once the smart object icon appears on the image thumbnail, you will be able to double click that layer and edit it. To edit, simply enable your window to have the "adjustments" tab (this is by default there.) You will see a few selections of editing tools that will come in handy, you can also go to the top and select Image>Adjustments. The good thing about the Adjustments tab is that it creates an editing layer within the image layer and that allows for easy on and off.
Step 4:
You can now press Apple + S or Control + S or File>Save to save that image, so you can go preview on your original file. Once you've edited that image and you closed it but you need to edit it again, just double click on the image again, click save to preview on your original file every time.
 Step 5:
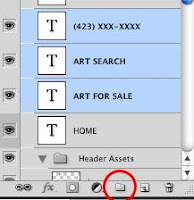
 To do this, select the layers you want to organize and click the folder icon at the bottom of the layers pallet. These layers will now be in a folder, you can rename that folder by double clicking the text next to your folder icon (ie. "Header Assets").
You can have a folder within a folder, just keep selecting layers and group them! They can get pretty complicated, but it is 100 times easier to navigate through hundreds of layers if they're grouped.
Step 6:
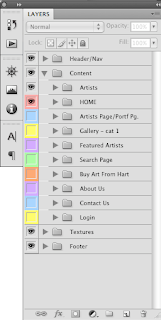
 To keep these folders under control, and have them exactly where you want to, you'll need to create a system that is comfortable for you. I name them according to their location on the page, it helps me know where things are not only in the layers palette, but also the page. Location is important because if you need to move something in the header to the footer, you'll only select the folder named header and shift the whole thing to the bottom. When you have files unorganized, you have select each file at a time and that takes time, to save time, Start Grouping!
Here's an example of excellent grouping by Melissa Meek.
 Optional Step:
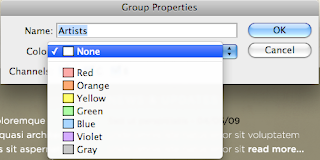
Melissa also went ahead and gave each page within the website their colors, this helps identify them a little better, colors are always handy. To do this simply right click on the folder layer and select "Group Properties." Select the color for that specific color and click ok! And now your group has another way to identify itself.
I hope this simple tutorial helps you keep files organized when you're working with multiple files in photoshop and easily editable by your coworkers in the future. Please feel free to add to this and don't forget to comment on your own way to do this, others might benefit.
www.francheskaboria.com


No comments:
Post a Comment